This mini-tutorial was originally written for MTS in 2008, but never published. Maybe someone will still find it useful.
What this mini-tutorial is for: To show how to take nice bright pictures in outdoor and indoor settings. The goal is to end up with pictures that clearly show the detail on a sim's clothing - but taking bright pictures is helpful no matter what you need them for.
See the Light: Taking Sunny Outdoor Pics
When taking pictures outside, it's easy to end up with something that's dark and shadowy. But it's also easy to end up with something bright and clear - you just need to face your sim in the proper direction.
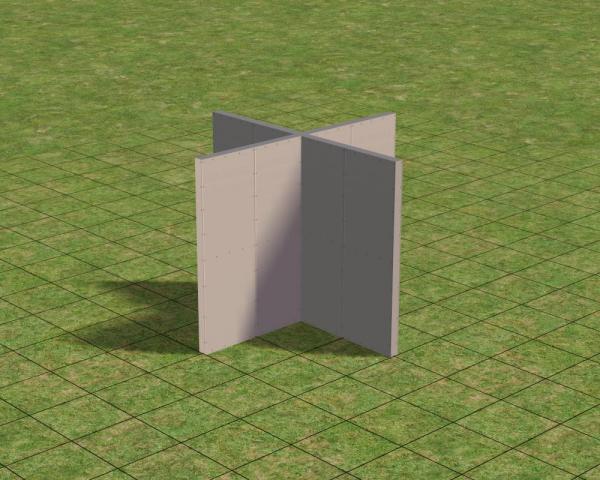
All lots in Sims 2 have a sunny side and a shady side. To figure out which is which, simply build 2 intersecting walls as shown below. Notice how the wall on the left here is bright (sunny) while the other is dark (shady):

When your sim stands against the sunny wall, he's nicely lit and easy to see:

But when he stands against the shady wall, it's hard to see him well:

Here's a side-by-side comparison. See how dark that shady side looks? You can hardly see the sim or his clothes. But you can see him very well on the sunny side:

See the Lamp: Taking Bright Indoor Pics
If it's nighttime or bad weather in your Sims' world, you may need to move the photoshoot indoors. Sometimes an indoor set is best for certain items too - white clothing tends to get washed out in direct sunlight, for example, so it's good to photograph it indoors.
Like outdoor pics, photos taken indoors can be dark and shadowy or bright and clear. It all depends on using enough light, and putting that light in the right place. The following example shows 3 different lighting conditions.
The pic on the left is taken at night with no lights. It's very dark and hard to see. The middle picture is taken at night with a light behind the sim. Like in real life, putting a light behind your sim creates a dark shadow and doesn't light him well at all. The pic on the right is taken at night with a ceiling lamp and a floor lamp, both placed in front of the sim just out of camera range. This lights him up well.

In Conclusion:
It's quite simple to take bright screenshots once you know how. Just see the light! Whether you're taking pics outdoors or indoors, at night or in daylight - look for the bright side of your lot. Place windows and lighting in front of your sim as needed. Delete your guide walls if you want an outdoor scene, or just add some simple paint and flooring and voilà! - you'll have a nice bright picture to show off your upload.

Bonus Tips:
- Move your sim, not the camera! To photograph the back of your sim's clothes, turn him around with the "moveobjects on" cheat. If you turn the camera instead, you'll end up with a dark shady pic of his back.
- Here are some InvisiLamps made by me especially for picture taking.
- For tips on positioning the camera and getting large clear screenshots, see this Screenshot Basics Guide at MTS and this CameraMan Mode Tutorial salvaged from the old Sims 2 Exchange.
What this mini-tutorial is for: To show how to take nice bright pictures in outdoor and indoor settings. The goal is to end up with pictures that clearly show the detail on a sim's clothing - but taking bright pictures is helpful no matter what you need them for.
See the Light: Taking Sunny Outdoor Pics
When taking pictures outside, it's easy to end up with something that's dark and shadowy. But it's also easy to end up with something bright and clear - you just need to face your sim in the proper direction.
All lots in Sims 2 have a sunny side and a shady side. To figure out which is which, simply build 2 intersecting walls as shown below. Notice how the wall on the left here is bright (sunny) while the other is dark (shady):

When your sim stands against the sunny wall, he's nicely lit and easy to see:

But when he stands against the shady wall, it's hard to see him well:

Here's a side-by-side comparison. See how dark that shady side looks? You can hardly see the sim or his clothes. But you can see him very well on the sunny side:

See the Lamp: Taking Bright Indoor Pics
If it's nighttime or bad weather in your Sims' world, you may need to move the photoshoot indoors. Sometimes an indoor set is best for certain items too - white clothing tends to get washed out in direct sunlight, for example, so it's good to photograph it indoors.
Like outdoor pics, photos taken indoors can be dark and shadowy or bright and clear. It all depends on using enough light, and putting that light in the right place. The following example shows 3 different lighting conditions.
The pic on the left is taken at night with no lights. It's very dark and hard to see. The middle picture is taken at night with a light behind the sim. Like in real life, putting a light behind your sim creates a dark shadow and doesn't light him well at all. The pic on the right is taken at night with a ceiling lamp and a floor lamp, both placed in front of the sim just out of camera range. This lights him up well.

In Conclusion:
It's quite simple to take bright screenshots once you know how. Just see the light! Whether you're taking pics outdoors or indoors, at night or in daylight - look for the bright side of your lot. Place windows and lighting in front of your sim as needed. Delete your guide walls if you want an outdoor scene, or just add some simple paint and flooring and voilà! - you'll have a nice bright picture to show off your upload.

Bonus Tips:
- Move your sim, not the camera! To photograph the back of your sim's clothes, turn him around with the "moveobjects on" cheat. If you turn the camera instead, you'll end up with a dark shady pic of his back.
- Here are some InvisiLamps made by me especially for picture taking.
- For tips on positioning the camera and getting large clear screenshots, see this Screenshot Basics Guide at MTS and this CameraMan Mode Tutorial salvaged from the old Sims 2 Exchange.
Comments
#5
13-09-2014
Thankyou Fansee, I get so frustrated with my pics, never seem good enough, any help is highly appreciated!


